Showing posts with label Parties. Show all posts

Thursday, October 6, 2011

Pucker Up Lemonade Party


It was my niece's birthday a few weeks back and she's my little party planner. We've been talking about having a lemonade party for almost a year and she was so excited when it was finally her time. We were able to re-purpose many of the decorations we used for Andrew's construction party.

I loved how the stripes turned out and my brother-in-law added a wood slat roof...LOVE!

I accented with some plastic lemon slices from Michael's and flower garland that I picked up from Tai Pan Trading company.

Does that Lemonade sign look familar? It's one of the construction signs from Drew's party. Yeah for the re-usable letters!

I picked up these amazing felt citrus stickers by Jolee's and attached some extra glitter paper for some adorable cupcake toppers.
The cupcake wrappers are doilies... I love this trick and how beautiful they look.
My Sweet Birthday Girl. She loves lemonade... I love her!

For favors, my sister and I made lemonade kits... it had everything a kid needs to create their very own lemonade stand, cups, lemonade mix, wooden spoons, chalk and paper for the sign. I found these great strawberry felt boxes and we added some change in them to get the business started. I made some citrus hairbows to tie it all together.


Candy Bar

Was able to restring the fabric pennant banners and remove the blue and viola new decorations!


Tickled Pink at 504 Main

Tuesday, August 30, 2011

Happy 2nd Birthday to My Little Man! Part III..The Dessert Table!

 I love dessert tables and was really excited to put this together. I've been cruising Pinterest for months getting ideas and originally wanted to use fabric as a backdrop but decided to use a window instead.
 I hung paper lanterns from the ceiling. (You can't really see the paper lanterns hanging above in this picture, but I promise they are there.) I found this polka dot material at Walmart for $2. which I used as a tablecloth.

 Due to last year's lack of photos (I didn't take a single one!) I made sure to spend a few minutes before the guests arrived to snap a few photos. The only problem I hadn't laid out all of the desserts so it's an 80% done picture.  I did take about 200 photos but didn't capture everything I wanted to so next year I think we'll either need to hire a photographer and designate a family member "Photographer of the Day". 
I added a pennant banner in the center and finished the backdrop with dumptrucks I made from my Cricut machine. I just attached them to clothespins and viola! I fell in love with these little guys so I made enough to embellish all of my windows.  
I love dessert tables flanked with the guest of honor's name, so when I found these foam letters at Joann's fabric store for 25 cents a piece I was so excited. Originally they were pink and purple which simply wouldn't do for my little man so I painted them in line with the colors of the party. I added a painted wooden dowel wrapped with ribbon and found these great construction cones at you guessed it ... Dollar Tree!
Originally I wanted to make two large polka dot ribbon bows for the sides but my husband was adamant that there would be no bows...so instead I hung two large yellow shovels with ribbon (not bows :) ) and attached them to the table with clothes pins. I thought it ended up better than my original idea. So thanks Babe for the great decorating advice.

I found the orange and white striped flower pots in the $1 bin at Michaels and embellished them with construction stickers I found in my collection. I used those to house some chocolate and toffee marshmallow pops and a cute bin to hold the dessert forks.


I got some tool cupcake toppers from Shindigz and made my own road sign toppers

For dessert I made cupcakes, cookie pops, chocolate cake, and my favortie chocolate covered marshmallows rolled in toffee pops. We also had See's candy which I didn't make but I did eat! 
To finish it off I found these great plates at Target that were 75% off! Yeah for sales!! 
  
So I decided to use some to make my own cake plate! For the center I used a blue bucket I found in the $1 bin also at Target.

Speaking of cake... on Andrew's actual birthday, we went to Disneyland and were just planning on staying a couple hours (we have passes so we usually just jump on a couple rides and head home.) however, he was having so much fun we stayed longer than expected. The cake I was planning on baking got scrapped. Instead,  I bought an ice cream cake from the local grocery store. Have you noticed how expensive ice cream cakes are? Good thing they are delicious and with the heat wave we are experiencing totally worth it. Since I spent more than I wanted to on the cake and felt guilty for not baking one, I made my my own cake toppers. Handy Manny of course! I found a free printable from Disney Family.com for a Handy Manny toolbox craft I've been wanting to make. I just downloaded and printed out the printable (did I mention it was my favorite...free!) and added toothpicks.  Click Here for the Free Link

Overall I was quite pleased with my table! I hope you liked it to...
Next Up ...The Backyard. (It's My favorite part! )

504 Main 
Catch a Glimpse Button

Sunday, August 28, 2011

Happy 2nd Birthday to My Little Man! Part I

After months of seriously planning ...my son turned two! This Mommy can't believe I already have a two year old! I'm very excited to be bringing you pictures from the big day. There's so much I want to show you so I decided to take a few days and show you the pictures.

Drew loves Handy Manny and all things construction these days...so we did a construction/polka dot themed birthday. I found my inspiration months ago at the Dollar Store...where I picked up these adorable truck balloons! I loved the fun summer colors and great patterns and knew they would be the perfect start to a great party. While they had them I picked up 15..which is like the price of 3 mylar balloons at the party store. Save your receipt and you can bring them back the day of your party and the store will inflate them for free!


Greeting Our Guests...
 
We lined our driveway with the cute traffic cones we made and I showed you in an earlier posts. Click Here if you missed it!


We made a Project Birthday sign to welcome guests and hung it from our front porch.  On our front door I hung my curly ribbon wreath!
 I had originally planned on using my Cricut to cut out the vinyl letters for all our signs since they were going to hang outdoors but while at Michael's one day (umm..I'm there almost everyday!) I was looking for wall stickers for the playroom and ran across these removable letter stickers from Me & My Big Ideas. The font was adorable and I love the fact that they are removable so I've been using them ever since. Usually they are quite expensive but the store had them on clearance for $5 a package so I bought ever single package they had and then went to the store by my work and bought them out too. (Yes, I have a problem... but $5...seriously..you can't buy vinyl that cheap!) They also come in pink glitter and I know I don't have a girl but I do have a niece so I bought them too. I also got adorable baseball ones for the playroom. I'm not sure what I'm going to do when I run out. Good thing they are removable. I've been using them on banners, buckets and pretty much anything else I can label.  


 Ok so back to the party...Guests "Clocked In" at our Clock In Table by signing in a bucket I embellished with these mettalic letters I found at Michael's clearance aisle. At the end of the night it was a lot of fun to read all of the sweet messages our friends and family left.


Of course our mild California summer decided to come to an end this week and it was 105 degrees! I decided to move the photo booth inside and set it up in the playroom. The lighting wasn't the best but at least guests weren't so sweaty while they smiled for the camera. Unfortnately the only photo stand I had was a coat rack holder so it was a little shorter and narrow than I wanted but we made do. I put a bench in front of it so our taller guests could sit.
I made a bucket of props that included silly hats, road signs and mustaches. I found these great 3-D mustache stickers from Jolee's botique that were amazing. I stuck them to card board backing and added a wooden dowel. Our guests were so creative and funny in with our photos and it was a great way to ensure that we got pictures of all our guests!


Stay Tune for more pictures...Tomorrow is Indoor Decor!

  Catch a Glimpse Button Tip Junkie handmade projects

Sunday, June 19, 2011

Andrew's 2nd Birthday ... Under Construction

It's only two months away and Drew's 2nd birthday party is officially underway  My son is in love with Handy Manny and this year we're going to celebrate turning two with a Construction/Handy Manny. We've lovingly dubbed it "Handy Andy" and we are so excited about it. 


My husband and in-laws got into the fun and helped create these construction cone lawn art decorations that will line my driveway. 


To create these adorable cones... we started with, standard plywood that was picked up for $10. My husband cut out a template shape from cardboard and used a jigsaw to cut out the figure. Brian then attached a piece of pvc pipe to the back. (The pvc pipe can then be placed over a stake in the ground and makes them safer and easier to store.) After a quick sanding, my mother-in-law and I were able to paint the cones and viola...a great entryway addition to the party. 


Sunday, April 17, 2011

Curling Ribbon Wreath


I have been seeing alot of ribbon wreaths lately and have fallen in love. During my searching I stumbled across Embellished Bayou and this great ribbon wreath made of curling ribbon. I knew I had to make it for my son's upcoming construction party. I loved that it wasn't too girly. 
The color scheme for Andrew's party is orange, yellow, kiwi and a teal blue. It was a little time consuming but was so much fun and I'm really happy with how it turned out

I added one of Drew's truck's in the center to top it off. 


Thursday, April 7, 2011

Barnyard Bash


For my son's first birthday, we had a barnyard theme. I started planning the party when I was still pregnant and I was very happy with the way it turned out.

Here's the invite that I designed. I printed on cardstock lined with a solid color line border and matching envelope. 


My first birthday for my son and I forgot/was running around way too much to grab pictures of all the decorations, which makes me so sad but my mother-in-law was able to grab a few during the day. I did remember to take some pictures of items that I created before the big day, but apologize for the picture quality. 


Here are some Lollipop plants that I planted around the party. 


I chose not to do a pinata at Drew's birthday. Mainly because I have beared witness to just too many pinata accidents or close calls, but I think it's ironic that we take a figure that children love and then have them beat it. So I created a candy bar which the kids thought was great and the adults enjoyed too! I found some glass vases at the dollar store and found the barnyard ribbon from the local craft store. 


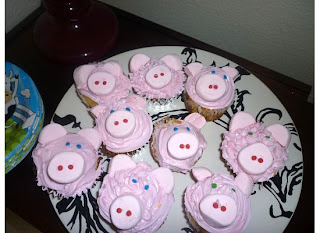
These little piggies were a big hit and very tasty! I made them using strawberry marshmallows that I found! I love pink marshmallows!!


I found these great treatboxes and barnyard animal visors from Oriental Trading Company. The visors worked out great since it turned out to be a hot day. 

Here's a picture of the living room. I found these great latex cowhide balloons that were perfect and I was able to decorate all around. I also found some amazing mylar pig and cow balloons. To decorate the outside we went to the local animal feed store and rented some hay bales that made for a great photo op.